I thought this post would exclusively cover the electrical undertaking in the roombox. Nah. Too many other things needed to happen before I could get that party started. Wait for it...

First off, I hadn't yet finished the wood for the roof/ceiling treatment. I wanted to bring some warmth to the birch, and have natural walnut beams (not basswood stained to look like walnut). I put the tung oil/citrus solvent finish on the ceiling, avoiding the edges, since I'll be trimming those with a 'fascia board'.
"Tung oil" sounds dirty every time I say/type it. Kind of like "tight end" in football. I giggle.
Then.
Dilemma.
"Tung oil" sounds dirty every time I say/type it. Kind of like "tight end" in football. I giggle.
Then.
Dilemma.
 |
| Shit |
At the miniatures store I frequent, they didn't have any 3/4" walnut flooring in stock. Which would have been friggin' perfect. The shop owner told me they order that stuff from California, and it usually takes 3-4 weeks to arrive. I don't have that kind of time right now. I really wanted the contrast of the walnut on birch. I perused their selection of flooring and went home disappointed with some blonde colored butternut (photo above) which had pretty grain and was on sale. My mind was restless about it. These beams will be permanent. It's not what I wanted. At all.
I was really bummed about making that concession until a light bulb appeared over my head. Why the hell I didn't think of this earlier was beyond me. I'm an idiot.
I was really bummed about making that concession until a light bulb appeared over my head. Why the hell I didn't think of this earlier was beyond me. I'm an idiot.
Make the walnut beams your damned self, dude.
I dashed upstairs to find that I had a piece of walnut 3" x 24" x 1/16". Just sitting there, waiting for a rainy day (it happened to be a hurricane day). That's why I have a lumber stash anyways, for situations like this, but I never check it.
That would give me exactly four 3/4" wide slats. Plenty. I could barely contain my excitement. My husband was frightened.
I sliced it, diced it, and boom! Perfection. Got the tung oil on that too, and boy is she pretty.
In the meantime, between coats of tung oil, I took the walls down and started step one of the wiring process. Deciding on a strategy, and subsequently mapping out the wiring lines (this makes laying the wiring down much easier, as you can see your pencil lines through the tape). I had two options in my head. One used less tape wire and more brads, the other used a bit more wire, but with far fewer connections. I chose the latter. Tapewire isn't that expensive (15 feet for about $8) compared with the frustration and sloppy appearance of brads (these can get pricey, I have approximately 500 of these, so I'm set for life) everywhere, and overlapping tapes, and ghastly tape ends. Don't get me wrong, there will be some of those things, but significantly less. I'm taking a more streamlined approach, seeing how this isn't an entire house, it's one room. One room that comes apart into pieces in seconds and can be put back together without glue. So proud of that feature. Can't stop talking about it.
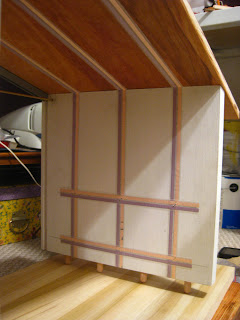
Here's what my pencil lines look like pre-wire:


Riveting, I know.
I have these plotted out everywhere except the ceiling. Once I have that screwed on, I'll connect the pencil lines from each wall across the ceiling, because I'm lazy and don't want to measure. As outlined in the previous post, the only pieces that will be fixed together permanently will be the roof and the two poplar walls. And only because I'm electrifying it. Otherwise, this item could be made to pack and store flat.
Once the tung oil had been soaking in/drying for a couple of days, I could attach it to the walls, three screws on each side. I pre-drilled the holes before putting the finish on the wood, and countersunk the pilots in the roof. Reason being, I plan on shingling it (eventually, not a current priority) and I don't want the screws interfering.


After plotting my electrical lines, I could start planting the tape. Normally (I say that like I've done this more than once. I haven't.), I take pictures of the wiring before painting over it. But just to be absolutely sure which color is where, I make a small set of rules. It's just personal preference, but it works for me. Here's how my dollhouse is configured (I'm going to have that all reversed in the roombox.) :
If the wire is running...
-horizontally on a wall, blue line on top
-vertically on a wall, blue line on the left
-on the floor or ceiling, blue line closest to the open side of the house OR blue line on the left
(sounds about as simple as a pregnancy test, right? ...kidding)


That makes it so there's no guesswork if a line needs to be added later.
No pesky sparks flying like when you're hammering into live electrical like they tell you not to in the manual.
I use cir-kit products. I like like them. They're incredibly easy to use. They didn't pay me to say that, or give me any free products. They (and Gerard Butler) don't even know I exist. It was their kit that I used to wire my dollhouse. The manual was thorough, there were no missing tools/supplies, and it was affordable (I bought the kit at Hobby Lobby with their 40% weekly coupon so it only cost me $25-30ish. Sweet deal.). My first attempt at wiring/lighting was a complete success, and there was no frustration whatsoever. It was a breeze. The entire system just worked the way it was supposed to as advertised.
Unlike anything else in my life.
I know that electrifying a dollhouse sounds intimidating. I urge you to try it. I took the plunge, and look at me now. I feel like a pro (I'm not, although I'm all but unstoppable with the electrical at this point), and I'd be more than happy to offer a hand if anyone decides to give it a shot. Just e-mail me.
My strongest piece of unsolicited advice would be to read the very short manual cover to cover before starting. And there are even some youtube videos if you're a visual learner.
Doing a roombox as a first project might be a great way to start instead of a six room dollhouse like I did. I already told you I'm an idiot. No shocking revelation there, folks.
Aaaanyways.
Back to your regularly scheduled programming. In a photo montage, naturally.

Lay the first tape where you want the junction splice and pound it in with a hammer. Then fasten it with the black screw. This is where your power cord from the transformer will plug in.
 Then use the test probe to check for downstream power. Let there be light!
No light? Don't panic. Try the rotary switch on the power cord (if your model has one) before assuming the splice has poor contact.

The test probe will leave holes in the tape. No worries. That's normal.
 Here's my entire line-in setup (transformer, lead wire, junction splice, tape wire). The tape-wire feeder line runs under the wall to the inside of the room, and all other electrical connections tap into that.
I tie a ribbon around the wire roll to keep it from going all willy-nilly as I go along. If you've tape-wired before, you know what I mean.
 One line down...
 Then two.
 Followed by the third, and the sconce and outlet lines.
I choose to use brads (rather than eyelets) at most junctions.
 Spring loaded eyelets make the connections at the sconce level. These will also be used for all ceiling outlets. This makes it so I can plug any (non-corded) fixture in any outlet since I use the cir-kit brand chandelier and sconce adapters.
 The whole enchilada.
Add my coffered ceiling trim, some outlets, and some unforgiving glossy white paint and you get closer to attractive.
Still have to install 15 spring-loaded outlets (2 eyelets each) in the ceiling/roof locations, some trim, and to finish the outside. You know, not much. I'm really nervous about the ceiling outlets, but those will have to wait until the next post. Sadly, I cleaned out the local store, and still needed 32 of the things. At $1.50 each. Ouch. They're ordered but it'll take them a week or two before they arrive, so here's how we're looking currently...
 Melt my heart of stone.


 I've got 3 sconce outlets and 2 plug outlets on each wall inside and out (except the utility wall). There'll be 9 flush ceiling outlets and an additional 3 in the porch roof. I hope and pray they work with the way I've hidden the wiring.
I like it. So far.
I want to buy those little brass outlet covers. Real bad.
And some lesser known items in the works:
 The beginnings of a stone fireplace that doubles as a wrench...


If you wondered about these holes in each wall of the roombox, they're for the curtain rod.
 You may have seen these in the prior post, but they're basswood 3/8" C-channel pieces that have a 1/4" groove. Perfect for trimming 1/4" plexi. Great, right? I picked that stick up on sale for ten cents, and spray painted it to look like aluminum. Someday when I grow up, I'll buy real aluminum C-channel.
Not much more I can do without the electrical components, so until then I'm off to play with my cubebot(s).
Sayonara.
 | ||
| Untreated walnut on finished birch (actually after I oiled it, this is just the backsides, thus the darker edges) |
I dashed upstairs to find that I had a piece of walnut 3" x 24" x 1/16". Just sitting there, waiting for a rainy day (it happened to be a hurricane day). That's why I have a lumber stash anyways, for situations like this, but I never check it.
That would give me exactly four 3/4" wide slats. Plenty. I could barely contain my excitement. My husband was frightened.
I sliced it, diced it, and boom! Perfection. Got the tung oil on that too, and boy is she pretty.
 |
| Finished walnut on finished birch. Lovely. |
Here's what my pencil lines look like pre-wire:


Riveting, I know.
I have these plotted out everywhere except the ceiling. Once I have that screwed on, I'll connect the pencil lines from each wall across the ceiling, because I'm lazy and don't want to measure. As outlined in the previous post, the only pieces that will be fixed together permanently will be the roof and the two poplar walls. And only because I'm electrifying it. Otherwise, this item could be made to pack and store flat.
Once the tung oil had been soaking in/drying for a couple of days, I could attach it to the walls, three screws on each side. I pre-drilled the holes before putting the finish on the wood, and countersunk the pilots in the roof. Reason being, I plan on shingling it (eventually, not a current priority) and I don't want the screws interfering.


After plotting my electrical lines, I could start planting the tape. Normally (I say that like I've done this more than once. I haven't.), I take pictures of the wiring before painting over it. But just to be absolutely sure which color is where, I make a small set of rules. It's just personal preference, but it works for me. Here's how my dollhouse is configured (I'm going to have that all reversed in the roombox.) :
If the wire is running...
-horizontally on a wall, blue line on top
-vertically on a wall, blue line on the left
-on the floor or ceiling, blue line closest to the open side of the house OR blue line on the left
(sounds about as simple as a pregnancy test, right? ...kidding)


That makes it so there's no guesswork if a line needs to be added later.
No pesky sparks flying like when you're hammering into live electrical like they tell you not to in the manual.
I use cir-kit products. I like like them. They're incredibly easy to use. They didn't pay me to say that, or give me any free products. They (and Gerard Butler) don't even know I exist. It was their kit that I used to wire my dollhouse. The manual was thorough, there were no missing tools/supplies, and it was affordable (I bought the kit at Hobby Lobby with their 40% weekly coupon so it only cost me $25-30ish. Sweet deal.). My first attempt at wiring/lighting was a complete success, and there was no frustration whatsoever. It was a breeze. The entire system just worked the way it was supposed to as advertised.
Unlike anything else in my life.
 | |
| My first dollhouse wiring supplies. |
My strongest piece of unsolicited advice would be to read the very short manual cover to cover before starting. And there are even some youtube videos if you're a visual learner.
Doing a roombox as a first project might be a great way to start instead of a six room dollhouse like I did. I already told you I'm an idiot. No shocking revelation there, folks.
Aaaanyways.
Back to your regularly scheduled programming. In a photo montage, naturally.

Lay the first tape where you want the junction splice and pound it in with a hammer. Then fasten it with the black screw. This is where your power cord from the transformer will plug in.

No light? Don't panic. Try the rotary switch on the power cord (if your model has one) before assuming the splice has poor contact.

The test probe will leave holes in the tape. No worries. That's normal.

I tie a ribbon around the wire roll to keep it from going all willy-nilly as I go along. If you've tape-wired before, you know what I mean.


I choose to use brads (rather than eyelets) at most junctions.


Add my coffered ceiling trim, some outlets, and some unforgiving glossy white paint and you get closer to attractive.
Still have to install 15 spring-loaded outlets (2 eyelets each) in the ceiling/roof locations, some trim, and to finish the outside. You know, not much. I'm really nervous about the ceiling outlets, but those will have to wait until the next post. Sadly, I cleaned out the local store, and still needed 32 of the things. At $1.50 each. Ouch. They're ordered but it'll take them a week or two before they arrive, so here's how we're looking currently...


I like it. So far.
I want to buy those little brass outlet covers. Real bad.
And some lesser known items in the works:


If you wondered about these holes in each wall of the roombox, they're for the curtain rod.

Not much more I can do without the electrical components, so until then I'm off to play with my cubebot(s).
Sayonara.
ok I was so confused when I started reading this but I stuck it out to the end and now I'm like "wow she really did a great job"
ReplyDeleteI actually picked up my roomboxtobe and now I'm thinking about wiring it but that's after I finish up my other projects ( I don't know why I have so many they just seem to keep sprouting up)
anyways I hope your lights come in I want to see this little thing shine
Mini Hugs
Marisa :)
Thanks! And sorry to confuse you, I'm a scatter-brain. I try to make the posts flow, but sometimes I have too many things going on at once. Sounds like you know all about that problem :) Wire up that roombox! You'll do great. And best of luck getting to the bottom of the never-ending project list, too!
DeleteYou make it look so easy. Now I'm thinking of attempting wiring mine in the coming weeks.
ReplyDeleteThat ceiling is GORGEOUS.
Wire it! I don't make it look easy, it IS easy! Serious.
DeleteI just hope that my plan to tap into the ceiling wires through the 'beams' works out. It hasn't been tested yet, so I'm not sure if it's feasible. I'll just die if it doesn't work. Or cry until I find a solution. The whole roombox was planned around the ceiling, the showpiece. Glad you like it, I do too :)
I've been thinking about doing an electrified roombox. You're going to end up convincing me, I can just tell.
ReplyDelete