Wednesday, April 25, 2012

Tutorial: Curtain rods with interchangeable finials

I decided to sneak this little bit in before I do the curtain panel tutorial. 
Since you'll be needing a place to hang said curtains. Obviously.
Or maybe you already have some miniature curtain rods hanging around collecting dust, but I didn't. So here's what I did.
The best part is that the finials are removable/replaceable, so you can change them on a whim, and in a jiffy.

You'll need:
-3/32" (or even slightly smaller) diameter metal tubing (comes in brass, aluminum, and copper).
-A hack saw, or scissors that you don't care about.
-A flat file suitable for metal.
-A pick (optional, yet helpful)
-2" head pins (maybe 1.5" for a skinny window), 2 per rod. (as in jewelry making supply, preferably in the same finish as your tubing)
-Beads for finials, at least two per rod.
-Eye hooks (really small ones, I think they're 1/8" size, can't be sure) These can be found in gold and silver-tone finishes. (seen below with ruler)


The easiest way to start, is to figure out how high/far apart you want the eye hooks on the wall, depending on your window size/location. The curtain rod will slip through these to hang, so try to keep them as level as possible (I just eye-balled mine, but I've got pretty level eyeballs).
You can even embellish these if you want. You'll see that I have, with wood or other beads. There's a reason, besides the added detail/realism.
Most of the beads I chose for my finials are 8mm-ish in size, and I didn't want them touching the walls, so I screwed the eye hooks into other stuff to get a little more clearance between the wall and the finial. Keep this in mind when you choose your finials. If it matters to you.

Enamel bead caps from Michael's

Scrap wood painted gold for this one.

And a filigree bead cap here.
Once you've got your eye hooks twisted into the walls, you're ready to make the rod. It's painfully easy. I buy this size (3/32") tubing in bulk in packages of 3-5 pieces, usually in 12" lengths at Hobby Lobby. That's the best deal I've found. And if I buy it with the weekly 40% coupon, it's basically a steal. I think it's between $3-$5 regularly for a  pack, depending on the metal.
Measure the distance between your eye hooks on the wall, add 1/2-5/8". That's how long your rod should be.
Using a hack saw/scissors trim a piece of tubing to that length, trying not to squish the tube in the process. Aluminum squishes more than the brass because it's softer. A hack saw really isn't necessary so long as you have an extra pair of scissors that you don't mind trashing. (My blue-handled scissors are my designated 'metal' scissors. I don't use my fabric Fiskars on this shit. I'm that type A. But it definitely pays to take care of your more expensive tools.)
This is a straight scissor-cut on aluminum. Yep. Squished.
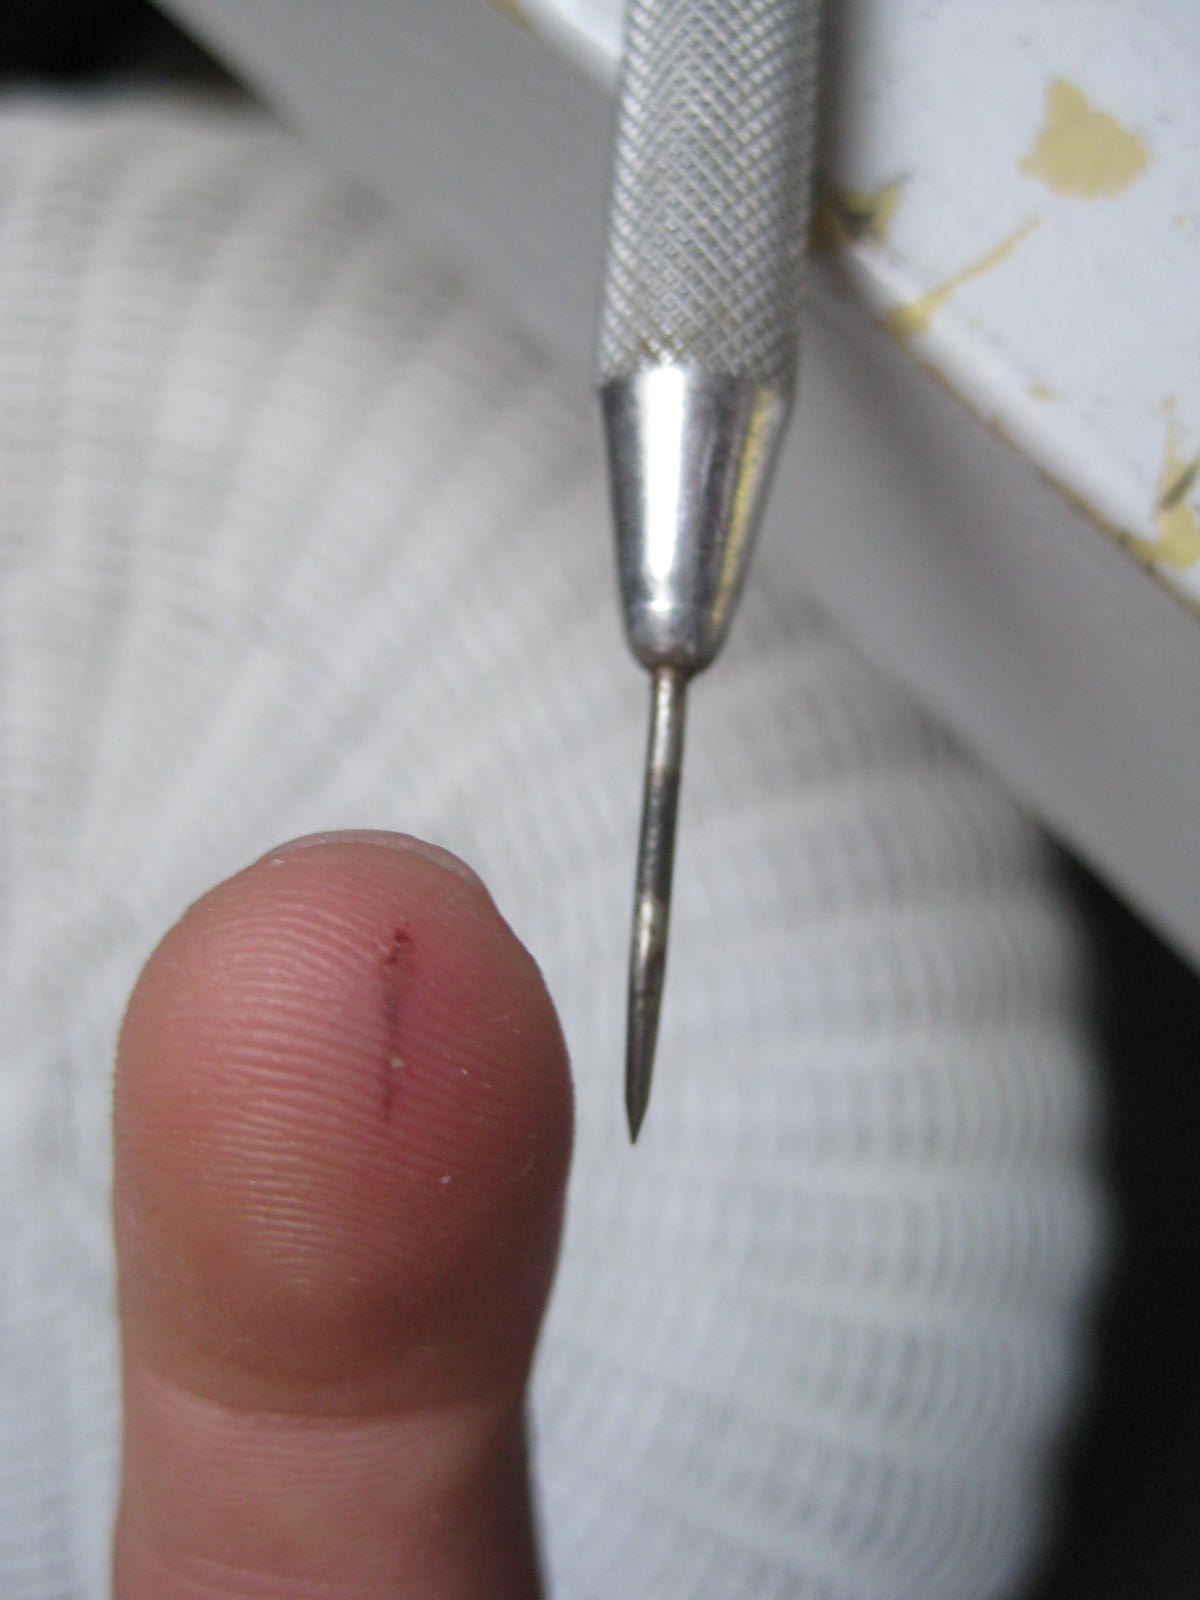
Not really a big deal, as long as you have an appropriately sized pick (you'll see in a minute).
Here's my go-to set, (I've had them for over a decade). Plus the one you saw go through my finger here.

I recommend doing the following for the best cut, especially with brass (it's the method with the least waste, I hate wasting metal):
Gently, make a groove around the tube, and keep working it slowly. Carefully bend the tube back and forth on either side of the groove and it should break pretty clean:
But knowing me, we'll make it cleaner.

I still use the pick to make the end perfectly round (optional, the file will do just fine if it's all you've got):


I love my file set from Peep's shop, but the flat one above is the most versatile most used in my collection. And I've had it since high school, it's from my N-gauge days.

Using your file, make the fresh-cut nice and smooth.
Easier than a manicure.
After that you're as good as finished.

Add desired beads to each head pin to make the finials, then give the remaining length of the head pin a few gentle bends (last photo in group below). This will keep the finials from falling out, gives them a bit of 'grab' inside the tube without needing glue. Interchangeable! I love versatility, especially when it's so cheap.
Old pink round finial vs. green leaf finial. Thoughts?

I used 3 bead finials in my living room.
 Go as crazy or as sane as you please. For the sake of boring tutorials, I'll stay consistent...
 Here's that bendy part I mentioned:

These are vintage glass leaf beads I had on hand.
Then insert pins on each end of the rod, and shazam! Fancy, custom rods and finials for your mini curtains.


Just pull out one finial, slide through the eyehooks (add a curtain in the middle) then shove it back in there on the other side.


Very swanky, indeed.
I might like the green leaves better than the round Swarovski finials for this room. I'll leave it and let it simmer for a while.

If you try this tutorial and happen to write about it, please link back to my original post. Thanks!

I should have the 'grommetted curtain panel tutorial' done and posted by the end of the upcoming weekend, if not sooner. (As you can see above, you can use the sheerest, most unforgiving fabrics, and you can't even tell it's a no-sew project. I'm really proud of this design. Even if grommetted curtains aren't 'in' anymore.)
Then my blog to-do list will be fairly well caught-up! Holy mackerel, I thought that would never happen.

Since I can't help myself, and I sometimes show you non-miniature things here... I'll show you what we just bought tonight. Ridiculous, but I had to have it. You know the feeling? I'm still reeling from the excitement.

vintage motor home
1980 Winnebago.
31'. Not miniature. 

Oh.
Mah.
Gah.

Totally pumped. Clear my goddamn schedule.


Sunday, April 22, 2012

I don't reward bad behavior

Are you there, Emily Henderson? I didn't think so.
Anyways. It's me, 'Flogging A Dead Horse'.
Or at least, that's what I think my Native-American name would be.
But just in case this post finds you, I'd like to tell you about something.
I once idolized you. In decor, and styling, and being a cute bubbly blonde, you have many talents that I wasn't blessed with. That being said, there's room for improvement.
You must be a terrible golfer, because your 'follow-through' sucks.
(If you can take that sick burn, you can handle the rest of this honest (passive-aggressive) 'open letter' roast post, dedicated to you.)

Since this may be your first visit, and I know you aren't here to review my 25-or-so I'm a Giant related posts (apologies, I lost count) for some grand update, I'll go ahead and help you find this one. It's the one where I mentioned that I was going to make you a surprise. A really nice one. All you need to do is read the first paragraph there to figure out what happened with it after you snubbed the challenge.

This post is the action-packed sequel. But you have to stick around 'till the end for the juicy stuff.

I'll start by sharing with you one of my favorite childhood proverbs. Yes, I've had it memorized since I was about ten. No, I'm not kidding.
For me? Words to live by.
For you, food for thought.

And me being me, somehow, this didn't stick:

 So, attempting constructive criticism here; I'll say something nice, followed by some tough-love.

You are a stellar stylist/designer/decorator/tv-hostess with a great sense of humor.
You'll be needing it if you read on...

You really let me down on your 'I'm a Giant' Challenge. I know it's because you aren't finished with yours. And you probably feel bad. You probably think your silence is justified, being as busy as you are.
But if you, for even a second, think that you're any busier than the rest of us... you are sweetly yet sadly mistaken. The fact that you didn't even acknowledge the work of 82(+/-?) very busy people who only participated because you threw down an official challenge, regardless of your inability to hit two self-imposed deadlines?

Disrespectful. Shame on you. And your (coincidentally silent) friends. They (except Orlando) haven't said a single word about a challenge whose deadline passed almost three months ago. At least Orlando was Homme enough to admit that he got in over his head.

Now that I've finally got that off my chest...
Onward.

 I'd like to point your attention over to this blog/page. It's kind of a big deal. I've been told that you and your publicist have been contacted, but I'll show you here, too. Just in case, by some slim chance, you haven't yet feasted your pretty blue eyes. Yep, the participants all talk behind your back. We wouldn't if you'd only show your face. I've heard everyone's been e-mailing you and shit... if we didn't see regular blog posts coming from you, we might've sent someone to check for a pulse.
We are dying to see what you've done with your dollhouse, if you've made any progress since your last post. Just show us already. It's not a secret that you aren't finished. We just want to see what you came up with so far! As far as the final update post goes:

It's your lucky day! The work's already done for you, better than you could have managed yourself.

Score!!

When I go check out that page, in all of it's off-the-chain glory... I feel like we're all at a surprise party, thrown in your honor, waiting for you to show up.

I know that she spent an extraordinary amount of time, effort, and love in building that page and making sure all participants were accounted for. I think you owe her a big "thank you, I owe you my firstborn". Or at least one of these:

So here's my best "SURPRISE!"
I brought a gift to the party.
I can't just have unfinished stuff lying around. Forget my proverb already?
I, too, spent an extraordinary amount of time, effort, and love crafting this one of a kind, special replica for you. Blood, sweat and tears. Not 'tears' as-in boo-hoo. Those are for kids and sissies. Tears, as-in, rusty tools tearing into my flesh. Literally blood everywhere. Ever seen Dexter? Digging through my college immunization records for my last tetanus date was wicked fun.

Deep. There goes my hand-modeling career. Thanks for nothing, Emily.
Also of note, this injury afflicts the index finger on the hand that earns my paycheck. Whatever. Pain is weakness leaving the body. All damned week.

All in the name of your "coffee table soul mate".
Style By Emily Henderson

Style by TinyFixation.

Say what?!
Why, if I didn't know any better, I'd say the resemblance is striking.
 Right down to your copper nailhead detail...
 
Yes, it's real brass. And no, you can't have it. 
Yet.
Or maybe ever.
Am I a pretentious bitch for thinking you even want it? Absolutely.

But it's starting to look really good in my dollhouse.

  I could make it work in the master, too. If I had to.

Anyone notice that I finally matted and framed the "Captain Morgan Silver" box?  Deluxe.
 
I've had this 5"x7" printout of the actual coffee table hanging on the clipboard above my work bench for a very long time. I fussed and fought about measurements.

Soooo, seeing your response time to e-mails in action here...
I'm glad I 'guesstimated' on those measurements. I can only imagine how long it would take you to hit delete on an e-mail titled "Yo, I need the measurements of your new brass coffee table trunk thingy. Down to the inch. Real quick.". So it may not be a perfect 1:12 replica, but damn it, it's close. I have the top surface measuring 3.5" x 1.75", and the height at 1.5". Say whatever you want about the hardware being too big. I had to make that shit from scratch. My fingers were hurting for days. I'm fine with it. And the change in placement of the handles on the small ends. Isn't that what you show-biz types call 'creative license'? That modification makes it easier for one person to carry. Ha!

 
 Copper nailhead detail, and a close-up on hardware. Nevermind my tweezers.
 I made some sacrifices on this project. I didn't do working drawers. Not my style to skip details of that magnitude, but thank God. I would have kicked my own ass for going that far, for such little return. And to think, I was going to hand nail-trim this with real brass nail heads. They don't make copper ones small enough. I know because I searched forever before totally going in the cheap-out direction with technique. Not sorry for that either. I spent enough hours just plotting and punching pilot holes for said nails.
Planning, and plotting, and punching, and dilating. Those 636 individually pierced nail holes weren't going to make themselves. Hours. Injuries. I've forgiven myself for any imperfections or shortcomings in this item. There are many (I tried not to photograph them). I don't care. Everything has a good side and a bad side.
Everything.
The core is somewhat sentimental for me, as it was actually a part of my dollhouse that I ripped out during the early days of I'm a Giant.
That chunk of balsa that was once a stairwell landing (cut down to exact size, by hand, nopowertoolsthankyouverymuch) fills and supports the brass veneer. So you can't crush it. From my clumsy dollhouse, to yours.

I'm still not against gifting this to you and your dollhouse-in-progress. I'm just holding it for ransom...
I just want to know that you gave a shit about your challenge, the sacrifice made by the participants, and that you aren't ignoring our pleas for your participation. We are fans, after-all, or we would never have found out about it. Just do something. Looks like there's plenty of room in that swanky new office of yours. Spring is all about new beginnings, right? And give snaps where snaps are due for that massive, painstakingly and beautifully curated 'I'm a Giant' update.

I was always planning to make you a 'hostess gift', however silly, for doing the whole thing. And when I read this post (quoted below) I knew what it should be. But those were the glory days, a time of great possibility, before the coming and going of the second deadline.
Followed by 32 tracks of silence like a friggin' Dave Matthews album.
Just get to the bonus song already, dude.

stylebyemilyhenderson.com
"As soon as I saw this I knew there was no question that Emily had to have it. I mean, it's a gorgeous brass trunk table. What's not to like? Emily practically skipped down the street holding hands with this thing once we bought it." -Orlando (guest posting on Emily's blog)

But I guess we'll see. 
Maybe I just got myself a bitchin' new coffee table. And I can literally go skipping down the street with it. Because it's cute and tiny, and it fits in the palm of my giant hand. 
Imagine how bad-ass my replica would look sitting on top of the inspiration piece though...

I still like you. Hope the feeling's mutual.
Peace out,
Meagan


Tutorial: Simple (demi)globe pendant light

Right now we're just lampin', but we're gonna get lit. Kidding. Don't go calling the cops.

1stdibs.com
stylehive.com
cococozy.com

 I call it a Demi-globe. Since the bottom part is missing, ya dig? And let's face it, Demi could use some love these days.

This classic fixture is so basic and timeless and goes with everything. Dress it up, or or keep it casual. You can make it any color, glue embellishments, whatever your fickle little heart desires. And it's so cheap to make that you can have as many as you want. You only need one pre-wired light setup (I'll explain in a minute), and the globes become removeable/interchangeable.
For the sake of the tutorial, I'm showing you how to make a plug-in fixture. If you're interested in wiring to a chandelier adapter, you probably already know how (if not, email/comment me and I'll help you however I can, but keep in mind that this modification will make your fixture cost an additional $6ish and make the globes less interchangeable).

The estimated cost for materials, per fixture on this tutorial project: A whopping $3 (USD). Assuming you have the tools already. For a custom, handmade piece, I'd say that's a damned bargain. How, you ask? The globes are... *drumroll bzzzzzzzzzzzzzzzzzzzzzzzt* Beer Ping-pong balls!! I recently found a box of 24 on sale somewhere (can't remember, perhaps Wal-Mart?) for about $3.

Let's get down to the nitty-gritty.

Here's what you'll need, no frills:

-Ping pong balls (May I suggest more than one, as backups in case the saw goes awry...)
-A razor/jeweller's/gentleman's saw. They all do the same thing.
-Sandpaper, medium to medium-fine grit. I used 100 followed by 220, to further smooth the surface.
-A sharp awl/pick, or a really small drill bit.
-Pliers. Needlenose/jeweller's style work best.
-Pre-wired and plugged screw-base type bulb setup. You can usually buy these anywhere you can buy dollhouse electrical supplies (and online, obviously). Hobby Lobby sells them for about $5/pair (use your smartphone to download the 40% off weekly coupon for a real deal). I buy a pack every time I go, to keep stocked. I go through them like crazy. Lights are my favorite to make. You can buy these from cir-kit here. Make sure you opt to get the round bulbs, not the candle flame for this fixture. They're cheaper anyway. Score.

You may also want, just for looks:

-Super-Glue. Like duct-tape. Just a good friend to keep hanging around.
-Paint. I like aerosol spray paint, the finish wins every time if you do it right.
-Metal tubing, 3/32". To hide wires, define fixture height. I like the 3/32" size for this application. You can buy it at the craft store, usually in a 3/4/5 pack. Comes in all finishes (brass/aluminum/copper).
-Brass brad. In the pictures you see here, I'm using cir-kit 1023-2 large hollow eyelets, but you could use up to a 1/8" scrapbooking brad if you wanted (you'd just need a 1/8" drill bit).

Get started:
Grab your saw and start hacking.
Take as much or as little of the ball off as you prefer. I usually just cut the logo off. Try to keep the saw super-straight and steady as you cut straight through. Longer, deeper strokes are better than short, choppy ones ("that's what she said"). Be patient, and expect to fuck it up a time or five. As you see below, you can expect a jagged edge here and there. That's permissible.
 Let's go ahead and fix it though.
Hold your sandpaper down with one hand and rub the new flat edge of the ball back and forth (turning occasionally) until it has a smooth, uniform shape. If you have sanding blocks, all the better. I'm sure I don't need to tell you how to use them.

Next, you'll poke a hole for the wires to pass through on the top of the globe. My method is very scientific. 
I stick my pick inside the globe against a surface I don't care about. In this case, my workbench. God, I'm stupid. Hindsight's always 20/20, they say.
 I get my eye level on the edge and move the pick around until it looks centered. Genius.
Take a look inside the globe, hold steady, and make sure you're at least eyeball-close to center, then gently punch through the plastic. And the paint-job on your workbench. Whatever.

Time for paint if you're interested.
In Lilly's dollhouse, I opted to match the existing imaginary fixtures with teal paint I had on hand, because I was lucky.

 The inside got a couple of brushed coats of a pale yellow acrylic craft paint. To give it a bit of glow.

 Then I stuck the brad through the hole (using the pick, my fat fingers would've never got the job done). Maybe a little super-glue between the eyelet-hub and the inside of the globe. If you want, not necessary.


Now you unravel and disassemble the lighting setup. Double-check and screw the tiny light bulb finger-tight into its socket. Often these come loose in shipping, and you'll go bat-shit crazy wondering why the hell your light doesn't work. Not that that's happened, or anything.

Take the plug off: Pull out the brass plug pins (pliers help), set aside and pull off that plastic piece, too. Save everything (says a certifiable hoarder). I'd cut the wires clean, keeping them as long as possible, just get rid of the frayed copper ends. They'll cause you more frustration than they're worth.
 Thread the wire through the brad (or bare hole if you decided to skip the brad altogether, just mind that you don't strip the wires in this process) from the inside of the globe.
 Pull wires through opening until light bulb is entirely inside ball. Don't pull too tight though, because you'll probably bust a wire and then be pissed that you've ruined the most expensive supply of the project. Not that that's happened, or anything.

Don't worry about my short wires here. I'm just using what's convenient for pictures. Make sure your wires are long enough to reach their respective outlet before you finish the fixture. Or better yet, before you purchase your pre-wired light assembly.

Now reverse the process and put the plug back on the wires. Here we go, another photo montage:


 Use your fingernail to strip about 1/4" of insulation off each wire, twisting it as you pull.

 Use pliers to push in the plug pins. They're a tight fit (usually).
If you want the rest of the words that accompany the above pictures, they're here, somewhere between the middle and bottom of the post. Apologies for my laziness.

Then you plug it in, and any frustration you felt along the way was worth it, right? I know.


I hope this was somewhat helpful, and I hope you can see how you can adapt these ideas to make a light fixture out of just about anything.
I just got an idea for how to embellish one of these in a fun way, so I'll give it a shot one of these days and be sure to show you the results (as long as they aren't too embarrassing).

If you try this tutorial and happen to write about it, please link back to my original post. Thanks!
You da bomb.