Hey everyone, the Urbanite deadline has come and gone, and the results are tantalizing!
If you haven't seen the work, you might want to make some time to wander through these places, and then, you even get to vote for your three favorites!
Sorry no pictures today, still in Albuquerque, but heading for the airport shortly. I'll do a blurb about the workshop I just attended this week once I'm home.
If you didn't catch my full Urbanite submission post you can link to it above, scroll down, or click here.
You've probably heard of the Undersized Urbanite Challenge if you're reading this post. You've come to the right place. If you'd like an explanation of my project objectives, along with empty promises of design features that didn't materialize, look here. Without further ado, here's what I threw together:
The whole enchilada. This would be a good one to click and view larger.
Before I crammed all of the 'stuff' in there, you could see the ceiling and flooring clearly.
Here's what that looks like:
I wanted cheap but realistic flooring. Lots of old mill buildings have
these amazing wide-plank floors. I chose some 3/4" x 1/16" x 24" cedar,
hand-picked the grain on every piece. A slick of tung-oil lends a low-luster natural finish. It's my favorite finish for any wood with decent looking grain.
More often, I thin it with citrus solvent for the first few coats, but this time... ain't nobody got time for that shit.
"I'd
really prefer something pre-mounted on mesh instead of laying over
1,200 teensy bricks individually. Since there's a deadline looming and
all."
Oh hindsight... you get me every time.
I glued each and every one of those damned things separately. I'm clearly a sucker for punishment.
The ceiling, I did in copper tiles (spray-painted corrugated scrapbook paper). With awesome I-beams.
The vintage TOMY kitchen is a win. Slightly smaller than 1:12, so it makes a delightful apartment-scale setup. The deer-head was one of a few swap items from Modern Mini Houses that you'll see in here. Also from her: the cactus on the table, the bedroom side table, the living room bookcase, most of the books and throw pillows, and a few other items... she spoiled me. Rotten.
He so fine.
The stools seats are drawer pulls and pipe fittings. I hate the word 'stool'. I'll let you imagine why.
The lucite platform was an awesome impulse decision. Now that I have an appropriate table saw and I don't have to use the plexi-knife, you'll see more.
The garment rack kills me. It was a shockingly quick scrap build, stuff I had laying around (the woods are yellowheart and walnut). I'm just bummed I didn't have tiny shoes for the holder at the bottom. Look at those tiny brass casters!! Straight-up tung oil on that, too. Whatever was left on the rag from the flooring.
It's always 7:20. Clock must be busted. Shitty.
This killer silk bedspread is a men's tie I thrifted for $1. Boom.
I resurrected this chandie from the pile where 'I'm A Giant' projects went to die.
Good save.
Of course the lights work. Electricity is my favorite thing.
Hey, look. It's my back porch. The only way to get daylight pictures at my house. Sorry.
Not that the trees are a realistic background for a city loft anyway. No trees grow in Brooklyn. Myth. I've been there. It's only potholes and misery.
Outside looking in.
It's not a city apartment without a bike hanging on the wall. That one was a prize at Dave & Busters...
Shocks. Pegs. Lucky.
The bricks set up most of the color story for the room. Whites, blacks/greys, dusty blues, and reds/terra cottas. I found an (unsoiled) rug which really ties
the room together.
There are tons of things I would have done differently if I'd had the time. But I didn't, so I'm not going to tell you all of the things that could have been better.
I had to finish my submission early, because I'm totally gearing up for priority number one. My new workshop. Currently stationed in Albuquerque on Route 66 for Vintage Trailer Academy! I got to put this post together from a '69 Airstream Overlander we're renting since mine's not road-worthy. Yet. Blogging in style, I suppose. Or as stupid hipsters call it... 'glamping'.
Note the tumbleweed. I love the southwest.
Spring is here and it's finally warm enough to install my fancy new
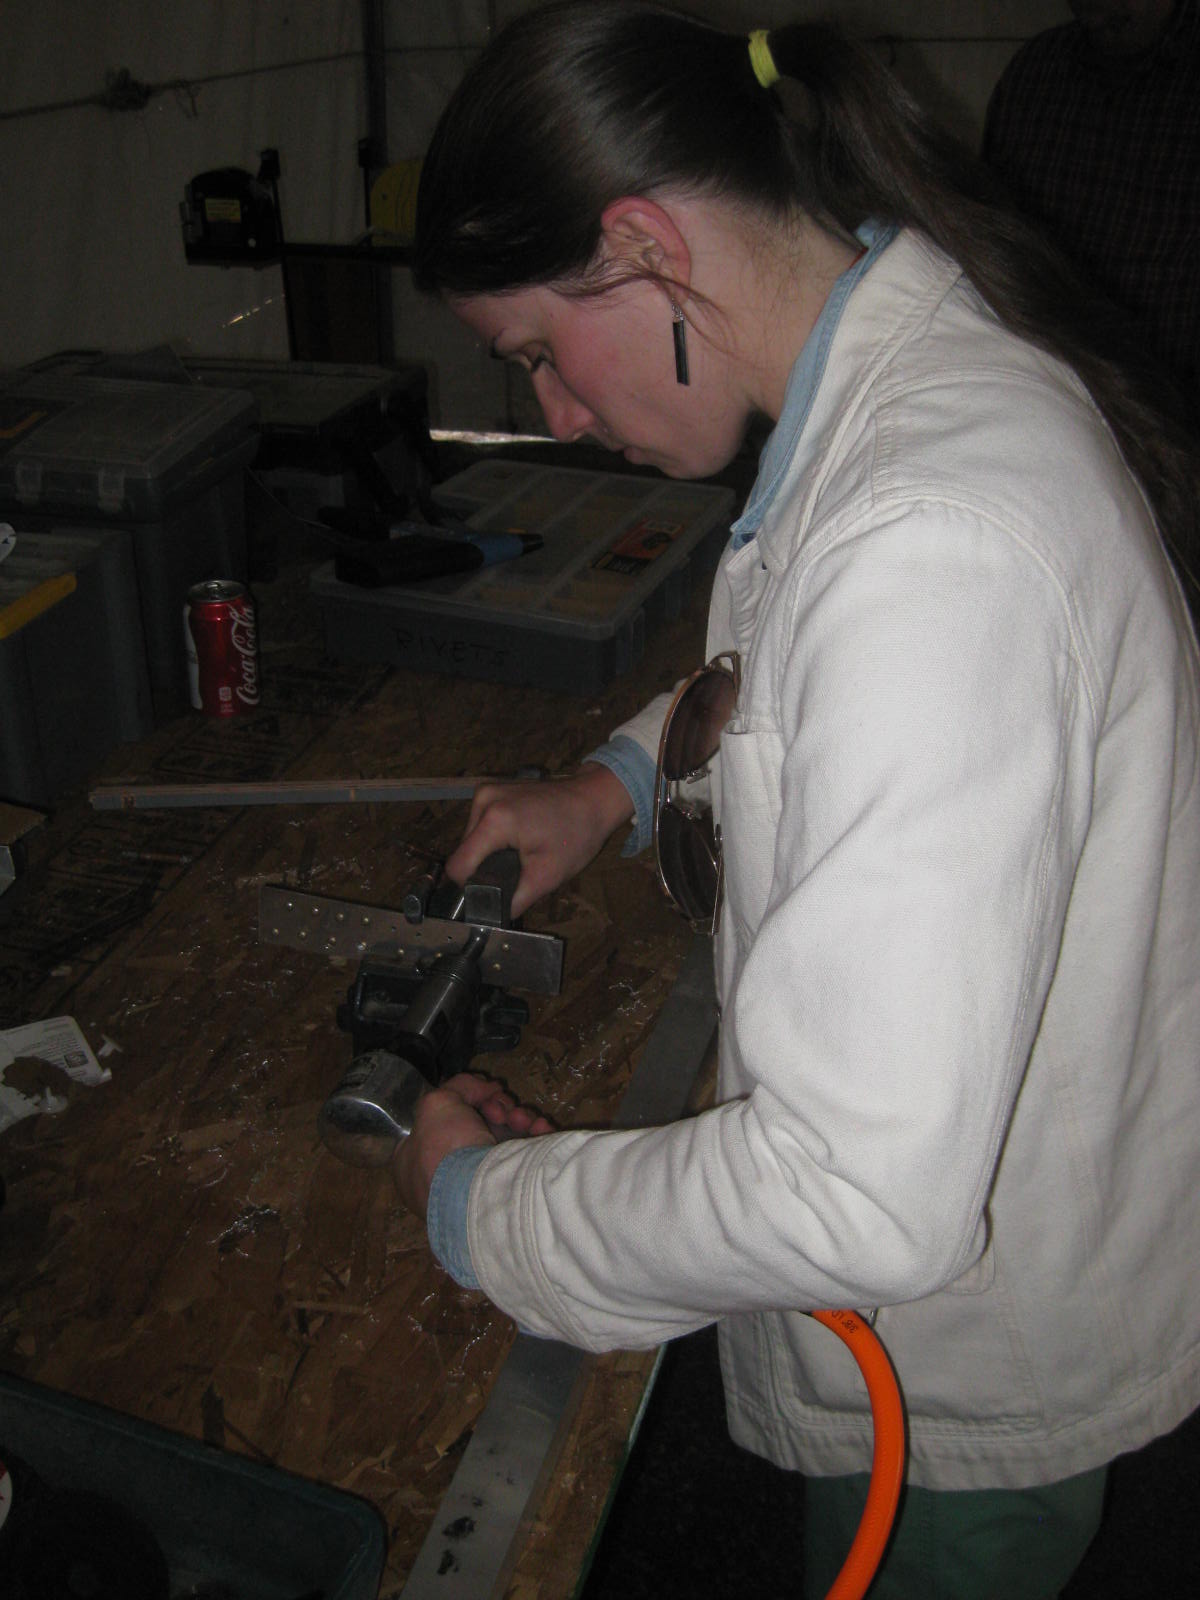
windows and start tearing that trailer apart. I'm pumped. You can bet
I'll be showing you all of that carnage. Here I am bucking rivets. It's a start.
Thanks for checking out my stuff, and major kudos to all of the Undersized Urbanite participants. They've all done an incredible job! Can't wait to see the finished projects and vote for my favorites!
Being snowed-in for a couple of weekends has given me some time to unapologetically start working on my Undersized Urbanite submission. With all of my current obligations it seems a bit frivolous, but it's not like I really feel like going out. Unless it's to a Goodwill.
I mentioned in my last post that I'd be doing up a very tiny apartment, about 300 square feet. Yep, you heard right. If I lived in New York City, that's likely what I could swing rent for. So how would I make myself comfortable, be able to entertain and accommodate guests, but not have to sacrifice lifestyle due to limited space? There's the challenge.
I'd like to spend less time on the structure and more time on really cool space-planning and convertible elements inside. I've opted for a simple plywood roombox. (Famous last words... simple, ha!) I just don't feel the need to have a million full-blown dollhouses. Yet. I haven't got the space, or time to maintain them. The idea of having a few roomboxes of varying styles for setting up scenes is growing on me.
The basic dimensions for the rough box pieces are as follows:
Floor 24" x 14" (336 square inches, but the walls will take a few feet away once assembled)
Walls: 12" height
Give or take.
Oh, you saw that? So what. I slipped myself the luxury of 12' ceilings. Give a girl a break. I'm sure everyone else is cutting themselves a little slack here and there. Some of those old industrial buildings had ceilings like that. And lucky me, I found one.
There will be exposed brick on (at least) the long wall. I'll attempt to make space for a dinner party of 8, 2 overnight guests, office/study space, and storage. Working electrical is an obvious given. Any additional square footage obtained from lofts/furniture is an intentional design feature.
So far I've got the roombox panels cut, and one side of each panel finished. Also got started on the bricks, that job friggin' sucks. Never heard anyone say "I want to be a bricklayer when I grow up". With good reason.
The pieces should all go together pretty quickly once I have them ready. I'm trying the 'work smarter, not harder' approach by doing as much wall prep as I can prior to assembling the structure.
Things are moving along, promise. You'll see next post.
No, that's not a Honey Boo-Boo quote. That's a TinyFixation original.
As you may have read, I'm getting a new workshop. That's enough to thrill even the least-obsessed crafter. I'm a craftsperson of the very obsessed persuasion, and dammit, I've outgrown my craft palace.
This is how you may remember it:
The main bench usually looks as above, but messier.
...and when it's clean.
It actually doesn't look anything like this any more. There's been more 'organizational evolution' (if that's what we're calling it, like a garbage man is a 'sanitation engineer') since you've last seen it. Guess I should go grab a pic or two of that nonsense... just a sec.
Yuck. But I'm glad it looks like a shithole right now, just to illustrate a point. It can be workspace, or storage. Not both. A clockwise turn from the center of the room reveals catastrophe at every glance. I'm worried about my tools and projects getting lost, or *gasp* broken.
Please, don't let the roombox cart hide this:
The piles behind it. Egads.
And it continues...
It's so sad looking. I just grab what I need from the outer echelons and sit on the floor in the middle of the room. Or even worse... elsewhere. I've started leaching out into other rooms. The craft cancer is metastasizing...
...into the loft:
...and into the attic (through the other door in the craft room):
I'm even invading the garage. Band saw and dremel are down there on a current assignment.
We've spent a lot of great times in that 10' x 10' cubicle of a space, and boy has it been a nice place to play.
But this will not stand.
The dilemma is this: I really want a freestanding workshop structure, separate from my home. Our home is for sale. I'm not going to build a nice shed/cabin thing only to have to move out and start over again when the house sells. Ah, first-world problems. I'm just afraid if I don't finally concentrate and get started with TinyFixation on Etsy, I may never get to it. So I put both at the top of my very ambitious 2013 to-do list, a workshop and an online store.
I may have also mentioned that my husband is pretty brilliant. A man with a plan. I should have thought of the concept too, but seeing how we have the
Winnebago as our recreational vehicle I never would have thought to buy
another. He knew I needed more space months ago, after all, he's the one giving me all these amazing power tools for gifts lately, and wondering why I don't use them.
But a workshop on wheels is the ideal solution for my chaotic life and unpredictable living situation. It's also in our nature and history to buy old campers and redo them. This will be our third. He was going to get me one for my birthday but since he knows me like no other, figured I'd want some input. I'll be the one working in it. So we've been searching, with little luck at all.
The trailer frame, roof, and enclosure need to be near immaculate. My favorite stuff is going to live in there. Bonus if the electrical, furnace, A/C, water heater, stove and range hood worked, but not any deal breakers there.
The other features: dinette, couches, beds, toilet don't matter since I'll be tearing most of it out to make way for custom benches. The mice can keep the upholstery, for all I care. Enjoy, until I forcefully and brutally remove you with extreme prejudice. I hear you guys prefer peanut butter over cheese these days...
Bottom line: I need more square footage, more open, usable bench space. And some special considerations to make regarding storage since I have a small arsenal of tools and supplies for pretty much every craft except glass blowing. Shit, that sounds fun, man. So I wanted to double my square footage, and figured I could best do that in a 27' to 32' model.
So we've been around to look at three '80's era 30' to 32' slabs this month, all unfortunately not candidates.We had started calling on trailers that were 4 hours away last weekend, but those guys didn't call us back. Thank God.
Fast forward to this morning...
Vic is always on the prowl (sketchy as it sounds) on craigslist, for whateverthehell. Men.
Victor:
"Hey, here's a 29' Argosy.........
...Babe. It's an airstream."
It was 7:45 am, but no shit there I was. Couch jumping Tom Cruise style, screaming:
"How long ago was that listed? Call that motherfu*ker. RIGHT NOW!"
He's all:
"Well, let's see, where'd they list the number... oh, here,
234-(trails off...),
No fucking way."
I'm dying over here, all:
"What. What?!
Is there a problem with it? Oh, no. Is it a pile?
...or do you know this guy. Oh my God, you totally know the guy!"
Victor:
"Yup. And matter of fact, he owes me money."
So Vic gets on the phone with the guy, and we could go see it in an hour.
It has two broken windows, and the sub-floor is soft (if not removed in areas), mice have made themselves cozy, etc... but it had better bones than any of the newer model campers we'd seen. And it was old, and unusual, and had character! It's so perfect I can't even cope. It's exactly what I would have asked for if I didn't already know how expensive they are... I'd been briefed on the budget long ago. This is considered a very extravagant gift in our house. It was a gift, after-all, and I'd be more than gracious to get anything that could fulfill workshop purposes, however homely.
Which brings me to the real kicker. Go ahead hate me. It was free in exchange for forgiveness of his $500 debt. Seriously? An airstream for $500 (already under-budget), without even having to pay a dime?! Even I hate me for it.
She's a real fixer, but all four tires were in excellent shape (Tires alone = worth more than the price paid for the trailer. Ha!), so we were able to haul her glorious ass home today. I can't wait to give her a sponge bath. I think she's rough around the edges, but like me, will clean up nicely when asked.
Hello, lover.
If you aren't pants-peeing excited over how beautiful that is, I don't think we can be friends.
Yep, I know. Rolling up my sleeves. Mouth guard, knee-pads, goggles...
It's supposed to get up to 50F next week sometime, she'll be filthy until then.
I've got the Argosy 28 twin bed center bath model. Date stamped on the trailer tag is 10/76. 1976! (I still have to do a VIN look-up to confirm). My floor plan is as seen (bottom left, in dazzling red), except the bathroom and closets are on opposite sides of the trailer.
I've found out that Airstream produced the Argosy line, which were a similar design/shape but painted. I looked on some forums and read conflicting information regarding their makeup. It's mostly aluminum but has a couple of panels made from galvanized steel. Tested it myself with a magnet. Mystery solved. I also found a full PDF manual from 1975.
I'll keep at it, and now that I've got some dimensions and a layout to work with I can start space planning.Our first steps will be to replace the two broken windows, put in new subflooring, and repair one leaky area. Until then it's pencil to graph paper, my usual process.
Which should be great practice since I have a basic plan for Undersized Urbanite.
I'll be doing up my dream Manhattan apartment, if I actually wanted to be a city girl. The catch, is that I could probably only afford 300 square feet. So it will be an adventure in cramming and creative space planning to make sure I'd be comfortable. I'm a girl who likes to stretch out.
I'll be able to construct a simple plywood roombox for this one.
Nothing too fancy. Since 300 square foot apartment rarely is.
But only simple windows, and electrical. Nothing as elaborate as the roombox in that department.
Now that the cat's out of the bag, I guess I should get started on both of these projects.
Until next time.
P.S. About that other thing I said:
My husband also knew I wanted to drive in a demolition derby ever since he took me to watch my first, so this year he's secured me a car worth destroying for the sake of bumper cars: the real game. It's a 1996 Ford Escort station wagon. White (for now). 5-speed. October 2013.
.JPG)


.JPG)
.JPG)

.JPG)
.JPG)
.JPG)

.JPG)
.JPG)


.JPG)


.JPG)


.JPG)
.JPG)


