Sunday, February 12, 2012

SomethiNg differeNt. For oNce.

Hooray for my very first non-I'm-a-Giant-post! I was digging around some older posts at Modernminihouses, and be still my beating heart, she has more than few posts about N-gauge (1:148) structures. Which immediately makes me want to talk about mine. I didn't even realize that these are the perfect size to be a dollhouse for my dollhouse until she suggested it. N gauge has a special place in my heart as my first mini-obsession.

So yeah, I know I told you I originally did the dollhouse when I was 12 or 13ish. I don't consider that to be any real miniature work. I just glued up paper on the walls, and popsicle sticks on the floors. Not that I didn't thoroughly enjoy it, it just didn't take a lot of skill/experience to make it happen.

So fast forward a bit to junior year of high school (I was about 16 or 17 years old, for any international folks). I started dating a sweet, reserved senior boy who was also a railroad enthusiast. I already wasn't that cool, so this wasn't exactly social suicide. He had an N-gauge train layout in his basement and he loved working on it. I liked helping out, but didn't know anything. For his birthday I decided I'd build him a building. I bought a laserkit at the local railroad hobby store and spent about 12 hours on it. (Lesson number one: paint before building. Cuts your build-time nearly in half.) It came out decent, and I was hooked. I don't know how many structures I built in total, but at least half of the laserkit N gauge line (they're well planned, inexpensive, and they assemble pretty easily). And probably a half-dozen others. I kept a few when we broke up. Here's the problem: none of mine are cute little houses. That means I'll likely be building another soon (which for me, is sometime in the next year). I don't know if I'll do a whole kit, kit-bash, or design and build from scratch. But when the time comes, you know I'll be talking about it here.

So, for fun, here's what I have collecting dust on a bookshelf in my craft room. Some are unfinished, possibly permanently. (I tried to dust 'em off with a stiff paintbrush to the best of my ability. But they're incredibly delicate, and I didn't want to destroy them, so leave your white gloves at home.)

Let's start with pictures of things I made, but don't have anymore. Break-ups can be so messy. And apologies for the picture quality, these were taken before there were digital cameras. You know, back when Napoleon was just a cadet.

So here's that first birthday-building that I did. It's a schoolhouse in Boston&Maine colors (or as close as I could get). The roof's too light, but that's his problem now.

A storage shed/garage. Unknown brand. It doesn't look like it was a laserkit. Probably Bar Mills, or NE Scale Models by the looks of it.

Warehouse (Laserkit #601 General service building)
More B&M colors, that's the line he liked to model, since it's local and all.

(Laserkit #645 Nine Mile House and Tavern)

This could've been a tavern/general store I never put any signs on it.


(Laserkit #602 Interlocking tower)


Another warehouse.

Laserkit #629 One story section house.
Laserkit #623 Corydon general store and post office.


So here's what I still have, albeit, none of it useful to me in any way. Purely decorative and sentimental.
We'll start with the unfinished stuff and work our way up to my favorites/best work.


 Here's a sweet little New England style bed and breakfast/hotel. It's so unfinished. I still have what I need to finish all of these up, except for time and motivation (which, unfortunately, are crucial). I think this was the Idaho Hotel kit by Bar Mills. Checked the website, and it doesn't look like it's available in N gauge anymore.

 This church is unfinished because this was when I was still afraid of electricity. I wanted to put a light inside to show that I had stained-glassed the windows. They come clear with the kit, I added some glass paint, and shazam. Super cute.
Laserkit #691 Crossroads church.

 Bet you've never seen an adorable outhouse. Glad I could fix that for ya.
 I can't be sure, but I think this may have been part of the hotel kit. It was over a decade ago and my mind is like a steel sieve.
It even has the corrugated aluminum roof. Awwww....


Here's a scratch build I did using balsa and scraps/leftovers from other kits. I call it 'cabin in the woods'.

Laserkit #604 Transfer building.

 This is a really big structure. A train can be driven all the way through with doors on both ends.

Oops. Clumsy man hands strike again. I'll have to fix the trim on that front corner. Balls.

Laserkit #608 One bay engine house


 This one's adorable. I have a little fire engine that can go inside, but I haven't built it yet.
Laserkit # 647 Hillview volunteer fire company

The doors are on paper hinges.


OK. We're down to the last two. Both are completed. I can't decide which is my favorite, I guess it's a tie.
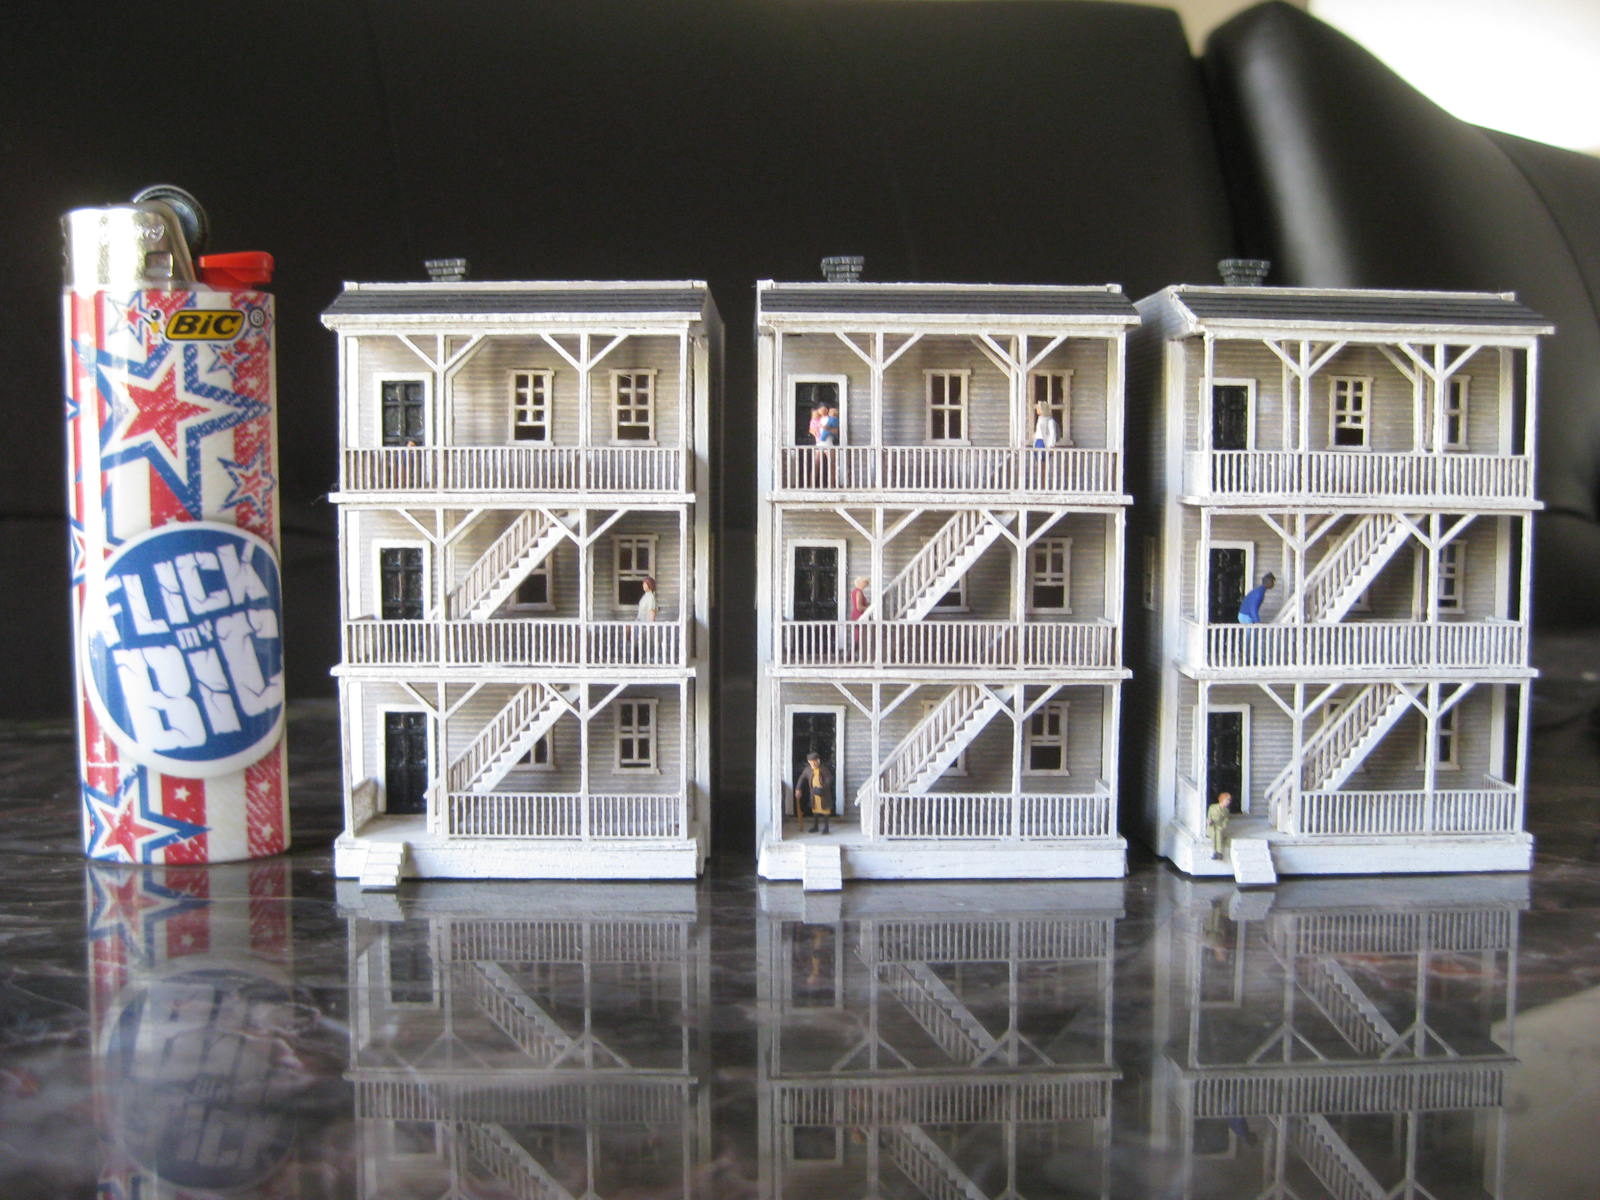
 This is the Northeastern Scale Models 'Tenement Row' kit.
 All of the windows have 'glass', some are left open at varying heights for realism. Also, this was my first experiment in weathering. I wanted this to look like the crowded, dilapidated, low-income housing that it is.
 The 'end units' have more windows on the sides than the walls that abut an adjacent building.


If I recall correctly, these came only with rolled roofing, but I thought a tar roof would look cool with the parapet walls. So I made a concoction from scratch, I can't remember what I used. I know there's glue in it.


And last but not least, the Dari King.
(Blair Line #082 Dari King drive-in kit)

 I don't think this could have come out any cuter if I tried.
 The rolled roofing is peeling up a bit in the back, but that's an easy fix.

 I even put signs inside, so you could see them in the windows.

That sign looks huge in this pic.

So anyways, I hope you've enjoyed this departure from my usual mumbo-jumbo. I know I have. It's always fun to rediscover memories, and appreciate what you have. Even if you can't use it. I might contact the ex-high school sweetheart and see if he wants to trade a couple of structures, we still keep it friendly. I'm pretty sure he has the farmhouse/barn combo, and I want it. I have no use for the engine houses. Always worth a try. I ain't too proud to beg.

I'm off to work on my modfire. Check you on the flip.


Monday, February 6, 2012

Let's talk money.

So. Here's the part I'd like to avoid. Mostly because I like my husband and want to stay married. But first, some background/perspective...

I firmly believe that to break into a new hobby it costs $1,000. You could argue with me about it, but I would win. If you don't invest enough initially, you probably won't have enough fun to stay interested. For example: Kayaking. I decided last year that I wanted a kayak since every time I ever used one I walked away saying "dammit, I want one". So driving home from 4th of July in Maine last summer, I said to my husband "dammit, I want one... Ima grown-ass woman, I work hard, I get that paper, can't tell me no." So I whipped out my phone and started perusing Craigslist. I researched options, read reviews, figured out exactly what I wanted but wasn't about to buy a new outfit. I didn't know for sure if I would stick with it, and I generally believe that buying anything new is a waste of money. So I found a used one. In friggin' Pennsylvania. But it was the exact model I wanted, even the color, and dude said he had only used it about 6 times. Came with a nice seat, dry-bag, fiberglass paddle, and for $500. I bit the bullet, and drove down to get it. 13 hours round trip. Alone. Long story short, absolutely worth it. I got so much use out of it last summer and I can't wait to get back in this year. After I bought a few accessories, roof racks, etc. I had spent about $1,000. Had I spent less, and got a beginner cheapie boat that was slow, with crappy tracking, tippy stability, heavy aluminum paddle, no hatch, blah, blah, blah... you get it. I wouldn't have been satisfied, and may have seen my initial $250 investment as a waste of money, never to paddle again. See what I mean? You don't have to buy extravagant, top-o-the-line shit. But you have to be reasonable about your expectations for what you'll get for the money and find some balance. There is truth in the 'you get what you pay for' concept.

And now the dollhouse damage. For those of you still reading. I carefully added all my receipts and it came to a whopping grand total of $1200. Don't even think for a minute that all of that went into what you see in yesterday's pictures. That number is the enemy. We're about to start subtracting for things that don't count.

Firstly, tools. I went through those receipts and totalled how much was spent on tools. Tools don't count since I'll have them forever (or until I break them, I'm clumsy) and I can use them on non-dollhouse projects. I consider tools to include any of the following: sandpaper, saws, adhesives, punches, storage containers, drill bits, dremel attachments, exacto blades, etc.
Tools: $150.

Secondly, returns. I plan on making a shameless amount of returns. I have a bunch of paper, supplies, etc that I thought I would use, but didn't. Gonna send a bunch back, and I don't feel bad about it either.
Estimated returns: $100.

Sweet. We're under a grand now. I feel better already.

Thirdly, gifts. Dad gave me $200 for my birthday (in November) and another $200 for Christmas. I also amassed $70 in Hobby Lobby gift cards. Mom went to Earth and Tree Miniatures and bought quite a few items for my B-day (I spent an unreasonable amount of money there, myself). That place is like the Louvre. You could spend a week in there and not see everything. It helps that their prices on electrical supplies are as good as anything you'll find on the interwebs, and I don't have to pay shipping/taxes, or wait a week for it to show up. It's 15 minutes from my place of employment. It's natural to be jealous. If you live in the area, they offer dollhouse wiring classes. I did not partake, but it was comforting to know that if I couldn't be self taught, it wouldn't be disastrous. And the people that work there are incredibly friendly/helpful/passionate about miniatures. No they didn't pay me for the plug. I just like them and their operation.
Gifts: $470.

Now for the hardest part. Out of the money that's left over ($480), what actually went into the dollhouse? Here's the problem. If I wanted one or two craft mirrors for anything, I had to buy a bag of a dozen. And so on for anything that can't be purchased individually. Which is pretty much everything. Ya dig? All of the following figures are honest estimates of supply costs.

Electricity/Light fixtures: $150-200. Seriously. I spent the bulk of that on bulbs/wires/adapters/components to make unique one-of-a-kind pieces. Actually wiring the house was super cheap and easy. I bought a Cir-Kit starter pack for $20 using a 40% off coupon at Hobby Lobby. I needed an extra 5' of tapewire, outlets, and spring-loaded eyelets on top of that. I read the included manual cover to cover, and didn't have one single problem doing the electrical myself. Anyways, way cheaper/cooler than paying to have someone else wire it, and buying generic plastic fixtures. Making modern, stylish, operational miniature lighting is actually my new favorite thing to do. I have ideas for more light fixtures than I have places to plug them in.

Woodwork/Lumber: $200 total? This estimation is dicey. I bought a lot of mini lumber. Mostly basswood, a little balsa, but a few choice pieces of walnut, too. I have a lot left over for future projects. I like having plenty of my preferred sizes on hand in case I get an idea that I want to execute in a quick way. The beadboard in the girls' room was pricey but worth it at $4.70/3"x24". The railing on the treehouse loft was over $13 for a 10" length. Total spent on trim (baseboards, chair rails, etc.) probably about $40. Plus I made a bunch of furniture. So maybe $100 worth of that wood actually made it into the house. But it's details like trim, window, and door casings that separate the men from the boys.

Metal: $25. For various brass/aluminum/copper items (tubing/rods). 'Sheet metals' (30-something gauge embossing foils, at least one 12"x10' roll in each metal) were free, because I'm a very lucky girl.

Fabric: $50. Again, totally guessing. The only receipt I'm missing is the one from the fabric store. I may have used $15 worth. But fabric is for keeps. If I bought it, I loved it. And there's no buyers' remorse in that.

So that leaves us with around $100, which I spent on beads to become vases, and various other accessories (pots, pans, etc.) to make a house feel like a home.

That's about the best I can do for a breakdown of what I spent on this venture. Did I overspend? Nope. I don't think so...

How many hours of entertainment did I get for my money? In any other context this sounds like a very dirty question.

I estimate that I spent approximately 300 hours designing, sketching, building, decorating, and so on. Based on having 4 months to work minus 3 weeks around Christmas when I was totally burnt out on this project, discouraged/relieved (if that's possible) about the deadline extension. I spent an average of 3 hours/day (less on weeknights, more on weekends). Eh, it's a rough estimate could be more, could be less. But that's a lot of 'entertainment' for the investment. It would be more entertaining and less depressing if there was some closure to this thing. I'd practically pay the challenge creators to post something challenge related at this point. I hate feeling like I spent all of this time and money in vain. Since we're in the circle of trust here, I'll be honest and say I'm more than a little bummed about the silence. Chill out. I'm not going to slit my wrists over it. I'm still really glad I participated. It was fate (call me cheesey, but everything happens for a reason). This project has reconnected me with a part of myself I thought I had lost. No matter how life may try to hold you down, or how many hard-knocks hit you... no one can take your creativity away.

In the end, challenge or no challenge, I ended up with a unique, heirloom, 75% handmade dollhouse that I can be proud of and pass down to important people who don't exist yet.

On a lighter note, I picked up a deck chair at the Portsmouth Goodwill yesterday. $5. Love at first sight. I started to walk away from  it for a minute, you know, to think it over. And some bitch started towards it with that look in her eye. I hot-footed and snatched that shit right up. Five. Dollars. Why was I even wavering?! The aluminum is worth more than that if I scrapped it (don't worry sweet little chair, I would never). The seat is hand woven by someone with serious macrame skills. It's tight enough to bounce a quarter off of, and comfy as can be. I wrote this entire wordy post sitting in it.
 
And it's sparkly! Yep. For realzies. Even the cashier said it was the 'find of the day'. Pretty sure she knows what she's talking about. Success.

Sunday, February 5, 2012

I'm a Giant (liar)

I know I said I would post new pics/commentary/tutorials this weekend. For those of you who care, I'm a New-Englander. So you know what this weekend is about for me. If you don't, I pity you. I'm not a complete liar, I did take some daylight pics of the dollhouse, I completed a couple additional projects (overestimation. exact count: 1.5 projects, both electrical, you'll see). I will give additional commentary, as promised (I'm a loudmouth, it's unavoidable). But the tutorials? Not this weekend. Sorry dudes. I did decide what one of them will be though: I'll show you how to make my grommeted (sp?) curtains and curtain rods with changeable finials. I'll also show how to wire a simple lamp, too. Easy peasy.

Ok. Lets get to the eye-candy. I've had a request for the zoom-out-total-dollhouse view.


BOOM.

Kids' room:

 Almost everything in this room is homemade by me. The only store bought items are: the stick pony, the cow puzzle, the worry dolls, pewter zebra (in loft), stuffed jointed elephant, and the blue book. Any vases you see are beads that I may have had on hand, or bought specifically to be vases in this dollhouse. Everything else (and I mean everything) was designed and built by me (although my mom did help sew some pillows, because she's the bomb).
 The 'roots' of the tree grow down the birch trunk. Hard to see in pics, but looks cool in person.
 In life-size, this would need to be recalled for safety issues. But in 1:12, the railings pivot and swing out so you don't bust them trying to place throw pillows. Even so, I still needed to use tweezers to get them where I wanted. I have big clumsy man-hands like you read about. And there's only 3.5" of wiggle room up there.
 That frame is from the dollar section at Michael's.
 Honeymoon champagne cork as a side table. My husband thinks that if I save shit like that, I should find a way to make it useful. He's exactly not the sentimental type. Obviously.
 The bolster is awesome. The twin bed has claw feet. Zoom if you don't believe me.
 Hard to tell in pictures, but the slide is aluminum. Not just silver paint, y'all. I've sent a few toys down it, since I'm too big. It looks fun for sure.
 I wanted to better show the detail in the cluster light. It may be my favorite thing that I've made.

Master Bedroom:
 
The only things in this room that I didn't design/make are the barcelona chair ($25, Reac) and the brass clock on the side table. Mom did all of the bedding and pillows for me, as time was running short (as if the deadline mattered, silly me) and she is kick-ass with a needle and thread. She's kick-ass even when she's not sewing.
The tripod lamp still needs a shade. It's going to be a short-fat drum shade. Maybe parchment, maybe brass. I dunno yet. I'm just glad I got it to this point. I've been avoiding this project because the smell of epoxy makes me want to vom.
Mom suggested a roman shade, and I think she was right (as usual). There will be a cornice box and real rod eventually. As of now, it is masking taped to the window frame. Sorry to spoil any magic.


The walls desperately need art. I think these Egyptian stamps will look really cool once I frame 'em. Eventually.
I had to rig something to hold this whilst it cured. Partially because of my aversion to epoxy, partially because my cat was being a pain in the A. This is the 0.5 of the 1.5 projects I did this weekend.

Living Room:

 This room has no changes, just daylight pictures. I have plans (and wood) to build a white lacquer/walnut credenza, and another chair. I have another accent light feature in the works (the miniature store only had 8 of the 12 bulbs necessary) it's 1/3 of the way done, but will be totally bitchin' when completed.
 I need better artwork than a Captain Morgan Silver box fragment. Or I need to frame it. I didn't feel like painting any strip wood, but this will have a black frame if it stays on this wall (or in the dollhouse. period).
This is really pretty sari fabric. I love it.

Bathroom:

So here's the other project I did. Finally, a ceiling fixture for the bathroom. I'm pretty happy with this one. The wires are more exposed than I prefer, but you can't win 'em all. Not bad for something I whipped together in about 30 minutes.


The bathroom still needs art and proper accessorizing. I'd like to roll up some towels spa-style on the wire shelving, too.

Kitchen:

So, again, not many changes here. Just daylight pics and a few more accessories. I added the mirrors over the banquette. Those are the cheapest, easiest things ever. No tutorial necessary. Simply 1' craft mirrors (available by the dozen at any craft store) and rubber O-rings taken from my husband's toolbox. Shazam.
 The artwork is another postage stamp. I love the quote (Benjamin Franklin). Politicians aren't what they used to be. To correct myself, I don't think that the word 'politician' should be used in any sentence describing any of the founding-fathers. Off soapbox.
 Eduardo (the bird) is in the kitchen because the study/piano-room is under construction.
 From the side window looking in.
I love this area. Everything except for the fruit bowl and its contents are home-made.
 That's why I take so many pictures of it.
The island, fridge, and dishwasher are upcycled from cheap-n-cheezey made-in-China stuff. Except for little knick-knacks/accessories, everything is home-made.

Study/Piano Room:

Though this isn't part of my challenge submission, I still think it deserves honorable mention. I put quite a few hours of work into it, even if it doesn't show. The giant window in the back? Wasn't there when I got the house. Trim, flooring and electrical are new, too. The ceiling is wired for a chandelier, ready to plug right in.

So there. I'm taking some time off. Probably a week. Then some mini tutorials. If there's anything specific you'd like to know how to make, lemme know. I may be able to accommodate. However, I am planning on doing some R&D on certain items (mostly lighting, some furniture), then making stock to sell in my Etsy shop. (If I'm going to sell it, I probably won't show you how to make it. Sorry in advance, but I'm sure you understand.)

Well, my team just lost. Miserably. Perfect timing. It's time for me to go to bed. Check you on the flip.