Monday, October 31, 2011

teensy copper range hood, for miniature kitchen smoke

I haven't worked with sheet-type metal since 'metal shop' in middle school. And I certainly don't have the right tools for it. But mind over matter, bite-the-bullet, I want a range hood! As usual, I go to my graph paper because mathematically, this one's a doozie (it looks worse than it was). I always try to get my projects to a place where they should work 'in theory' before I start experimenting with expensive supplies. I made a pattern, turned paper mock-up. It came out great, which means mad props to my high school geometry teacher.


 But paper's pretty forgiving, it bends/moves without leaving a semi-permanent scar. So I graduated to cardboard. It's rigid and shows mistakes. Perfect for the dress rehearsal. I refined my pattern to three pieces and got the model made up. It too, looked awesome. But who wants a cardboard range hood?!

Phases 1 and 2

 It sat in my studio, looking awesome and soaking up my pride for about 2 weeks. Then, the only thing left to do, was (gasp) grow a pair. I had to make myself start bending and cutting this stuff:


I was very nervous. I went about it in a systematic way and I found a method to correct minor flaws. This copper is 36 gauge, which is metal-speak for 'thicker than aluminum foil' but 'thinner than posterboard'. It's about the same as cardstock. I guess.


I only messed up one piece beyond repair, so I had to make another exhaust duct. Otherwise, I'm pretty impressed with my learning curve.

Shazam.


All that's left on this project is to make the flange that mounts it to the ceiling. And keep this thing safe from all of my crazy misfit animals.

Tuesday, October 25, 2011

tiny jackpot

I wasn't nearly as productive as I would have preferred this weekend, but I made a little progress. Since I need to wait to do walls/ceilings until I electrify, I've been plugging away at small projects (mostly furniture construction). That hasn't stopped me from purcasing wall coverings. I found the sexiest bedroom wallpaper for the master. The pics aren't as amazing as in person, since the gold is sparkly. I think I like it better with the stripes vertical, but I can't decide. Thoughts? Also, You can see the king size four-poster bed that's under
 construction. It's shaping up to be very sleek and tailored with the tapered legs and all. The headboard is keeping me from finishing, there's a conflict in the design department. I think it will be panelled with some brass accents. The bed will be stained/painted to look like ebony.


I found my cork!! These are rolls of 1/8" thick gasket cork from the automotive aisle . I'm going to stain/glaze it up in a couple of colors and do an awesome (I hope) inlay throughout the entire first level. I'm both excited and terrified to see how that plays out. Also, you can see a roll of copper that will become the kitchen range hood.


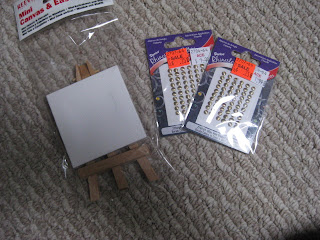
The easel is for the nursery, the stickers were priced unreasonably cheap, and they looked like brass nailheads without the hassle of actually having to nail them in. Score.


This lovely houndstooth ladies' sportcoat from Goodwill is going to upholster my living room set.


The green paper will be the nursery ceiling, I'll make coordinating area rugs out of the quilted pink paper.


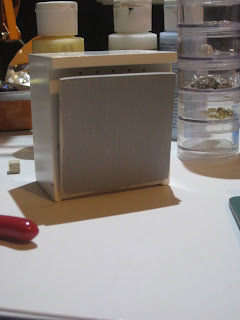
My oven-to-dishwasher conversion is awesome. My little plates and cups fit in the rack which slides in and out of the grooves. The wierd blank spot is for the silverware caddy. Not done yet.


I've been fooling around with the space planning in the kitchen. I'm having a tough time. I love the first layout because you can see the detail in the appliances, the downside is that the banquette blocks some of the view. 
I wish this wasn't so dark. Sorry.

The second option is here. Thoughts anyone?


Below are a few other items I picked up this weekend. The mini brass jorgensen-style, corner, and C-clamps all came from my Late-Grandfather-In-Law's (basically abandoned) woodworking shop. He was an expert carver, and there's a whole shop worth of stuff nobody ever looks at. It's an awesome resource. The little round bamboo box and the lace trim are from the local Savers. Only $3 for both. The box is already lined, and I think it will make a great coffee table/storage ottoman. The lace trim will make perfect bedskirts for the nursery. The yellow rolls are copper/brass embossing foil. And LOADS of it! I'm beyond pumped.


 And here is how my studio looks at any given moment. And that's only the half of it. It looks like a craft store threw up and died. There are generally at least three (dollhouse related) projects happening simultaneously.


Friday, October 21, 2011

productive thursday night

I had a very productive dollhouse night last night! Feeling good going into the weekend. (On the downside, that makes this a very long post. Apologies.)

I made mucho grande progress on the fridge. Chickity check it. It's really coming along. Here's the Cliffs Notes...

From this:
To this...
Picture a couple of crisper drawers on the bottom shelf.

I also spent some quality time with my star-player, the putty knife. Tore up every last popsicle stick on the first floor. I was originally hoping to salvage them but you gotta know when to hold 'em, know when to fold 'em. Cork it is. I had been dreading it because of the brick-removal fiasco but they came up in no time, only about 20 minutes invested there.


I really want a piano/library/study room, and that can only happen if I forgo having a formal dining room. And stairs. Small price to pay. So I've decided to have an eat-in kitchen. To make the most of my square inchage, I designed a banquette and I started construction last night. I'm just using 1/8" and 1/16" basswood since I'll paint/upholster it in the end.

I love having the right tool for the job. For once.
 
That ridiculous 3" penny is a souvenir from Washington DC when I was 10. I think it might make a cool table top.


I think this will be pretty special once I trim it out and upholster it. Probably leather. Maybe tufted?!

So that was last night. In other news, some smaller projects have included:

The piano bench. It was plain wood, just stained and poorly glazed. I thought it needed a leather seat, and maybe something else:
Ah, yet another crappy picture. It shows the wire detail at the base of the legs though. I've gotta read the manual to the camera (you know, in all of my free time. HA!)
I decided to make it look 'well-loved'. (Note the butt prints)


I found these shell beads at Michael's on sale, 8 for $3.49. I think they'll make pretty amazing picture frames.


I have a ton of this cheap n' cheesey dark glazed wood furniture. Mostly they're cabinets and credenza-ish, dresser things with a few benches/side tables. All a little different, but way to similar for me. I love the ecclectic look, I'm notsomuch into matchymatchy. I found a piece with a hideous octagonal cutout. Looked like a vanity for the bathroom to me. So I upgraded it. I was originally going to start in the bathroom, but then decided to hit up the kitchen first. Which has now turned into doing the whole lower level first (kitchen and piano-library-study room).


Cheap brown furniture. Yawn.
I added a coat of silver paint on the drawer fronts since they had been glued before being glazed, the stain didn't take uniformly and looked pretty busted. I changed up the hardware from 'bulbous wood nipple' to 'hand made chic crystal' drawer pulls. I filled the ridiculous octagonal cutout with a mirror, and filled the smaller lower cutout with a leather panel. I took one of the too-small-side-tables from the set to make a settee (probably more of a stool but I work in healthcare, so 'stool' doesn't sound particularly chic or luxurious to me). I covered the seat in the same leather from the vanity, and added metal and cork to the bottom of the legs for details' sake. And because I'm a sucker for punishment. I think this came out awesome and it looks great with my bathroom fixtures.

 
I love the way these little swarovski drawer pulls turned out!


Shitty photographer strikes again!

There are little teensy cork pads under the legs of this thing.


Shazam.

I haven't showed the color palette/overall look for the kitchen yet, because I'm not entirely sure at this juncture. I know hope I'll have cork floors with an inlay border (God-willing), lots of mixed metals... copper, silver and brass. Labradorite countertops (pardon me while my litlte heart flutters just thinking about them).... Okay, I'm back. Lots of blues, too. I'm thinking about nixing the charcoal brick on the back wall. Work smarter, not harder, right?! While I like the idea, I'm afraid it'll fail in execution. I'd really prefer something pre-mounted on mesh instead of laying over 1,200 teensy bricks individually. Since there's a deadline looming and all. I found these! I love love love travertine. They're a little thick, but who cares? They aren't going on the floor.


And then there's these. Over the top, but crazy beautiful:


I think these glass tiles would help tie all the mixed metals together, but would they be too much? I love the warmth of the travertine since everything in the kitchen so far involves cool colors. Dilemma. Guess I'll have to order samples and wait until I have my floors and countertops.

I saw a wall done in this giant black subway tile once, and I can't stop thinking about it. I'm hoping to eventually achieve something like these, but bigger in scale:


Anyways. That was yesterday. Gotta go back upstairs and finish the banquette.

smaller than your average mini-fridge

Pretty excited about this project. Got quite a few hours into it so far. Mostly waiting for paint to dry.

Here's what I started with:


Here's what I want it to look like in the end:

Thanks, flash. Never saw the dents in the freezer before.


Here's the play-by-play:
Removed all hardware. Broke out the pliers and pulled the shelves out (they had been glued).
Marked where to move door hinge, marked where to cut door into two pieces

Patched where the bottom hinge had been, notched out where the new one would go. Painted the inside blue. It definitely makes it look colder in there.
Painted the outside and doors silver.

Put the old hinges in the new spots. It's shinier in person. Good camera, inept operator. And it was about 10 pm. Way past my bedtime.
Not too shabby.
Cut up the old fridge shelves to make the body of the freezer drawer.
It took a lot of brainstorming to figure out what I could use to make the door shelves. I mean, what self-respecting fridge doesn't have a place to put milk in the door? These are going to be the perfect size once I cut them up. It's packaging from a product we use at work.

Trial and error with the exacto knife.

Bent some 18g wire and punched a couple of pilot holes in the door...


And shaZAM! Plenty of room for milk and condiments. (and beer, since I'm obviously a fan)


So there it is. I just need to find something to make two little crisper drawers on the bottom shelf, and since I'm always getting in over my head, I'm hoping to make it light up. And I've got to sort out handles for the doors:


I'm pretty satisfied with how this came out. China made it, but I made it better. Once Icomplete the final details I'll show some pics. Other projects are backing up, so I've got to put this away until the crisper drawers find me.